Your daily bread!
- Prashant Rao

- Mar 15, 2020
- 3 min read
Updated: Jun 2, 2020
Today I'll be sharing how I bake my bread. It's rather easy and would urge every one to do it. I bake for fun and baking bread is a subject that truly fascinates me. I truly wish I can bake artisan breads some day.
I have baked several breads and failed several times as well, but I think I have finally found a professional bread recipe.
3 Main secrets:
Bread Improver
Proofing chamber
No preheating
Get these three things in and you might just end up baking the best tasting bread.
This bread recipe is a 60% hydration bread. Which means if I am using 500 gms of flour I would need 300 gms (by weight) of water. So let's get right into it.
For baking measurement is key!
So its best to get a kitchen scale and measure your ingredients up.
You will need


After measuring all of your ingredients. Its best to activate the yeast to check if its alive. It's not really required, but I do it anyhow. It's just cool to watch the yeast in action! Take a cup of lukewarm water from the 300 gms measured and add it to a bowl, dissolve 1 tsp or 6 gms of sugar in it and mix 1 tsp instant yeast in it (you can also try active dry yeast or fresh yeast if you can get it). Mix everything well and let it sit for 15 mins. After 15 mins, you will see froth on the water, which indicates that the yeast is alive.
BAKERY SECRET 1: Before we move on I will tell you what does bread improver do.
Bread improvers stabilize the dough, help in better rise and even add a good warm color to the bread and ensures the bread remains soft for a longer period, delays the retrogradation of starch.
In a larger bowl take the flour and add salt and bread improver and milk powder in it and mix it well.
Now slowly add the yeast mixture and combine the flour. Add the remaining water till all of the flour and dry mixture combines into a solid mass.
Now comes the most important part viz gluten formation. Take the solid combined mass onto a working surface and knead the dough by stretching and folding for a good 20 mins (its quite a workout, but its key for gluten formation). Traditionally you could take your time and muscle and knead the dough for 20 mins or spend some good money and buy a stand mixer like KitchenAid.
Now while kneading slowly mix the soft butter and keep stretching and folding the dough. till the dough forms a lovely surface to it much like a baby's bum (traditional baker lingo, not mine!).


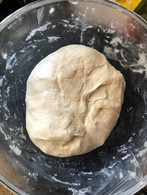
Brush the surface of a large bowl with Olive oil or butter or butter spray. Add the dough in it and cover it with a with a wet cloth or cling wrap.
BAKERY SECRET 2: Proofing chamber and 1st proofing:
In an OTG, take the bottom tray/dish and pour boiling water in it. Now place the bowl containing the dough inside on a rack over the hot water. Now close the OTG and let it proof for an hour. You could also maybe cover the OTG with cloth so that no steam escapes and the yeast can operate in a dark environment.

After an hour the dough would have risen.

Now puncture the dough and kneed for 10 mins and flatten the dough as per your bread baking tin size.


2nd Proofing.
Now keep the bread tin inside the proofing chamber again with fresh boiling water and let the dough set/rise for 20 minutes only.

SECRET 3: No preheating
It's important that you don't preheat the oven. Baking bread on a cold start allows the bread to rise a bit more.
Set the oven at 200 degrees Celsius and let it bake for about 20 mins, mid way you can turn the bread in the oven and spray a bit of water with a water sprayer to keep the bread moist.
After 20 mins or after you get the right brown you need, remove the bread from the tin, add it on a cooling rack and baste the bread with some melted butter.
I added some scores to it after my rise with a knife to make it look more rustic.
The final result is below.


I consume my fresh bread with some sour cream (really recommend Mooz brand), you could just have it with plain butter.
Try it, taste it and you'd know that this is probably the best bread you ever made.
Comments